You’re standing outside your front door with arms full of groceries when your smart lock’s low-battery warning flashes for the third time this week. Before you know it, the lock dies completely—no beeps, no lights, no way inside. This frustrating scenario happens to 1 in 3 smart lock owners annually when batteries unexpectedly fail. The good news? Replacing smart lock batteries takes less than five minutes once you know the exact steps. This guide reveals exactly how to change battery in smart lock units—covering both main housing and PIN pad components—plus critical troubleshooting for when your lock stays offline after replacement. You’ll never face another lockout crisis again.
Most homeowners don’t realize smart lock batteries typically last only 8-12 months despite manufacturer claims of “up to 18 months.” Extreme temperatures, frequent usage, and cheap alkaline batteries accelerate drain. When your lock finally dies, panic sets in—but you have two critical advantages: physical key access always works during battery changes, and the entire process requires zero technical skills. By the time you finish reading this guide, you’ll confidently handle any smart lock battery replacement scenario while avoiding common mistakes that trigger connectivity nightmares.
Find Your Smart Lock’s Hidden Battery Compartments
Missing the battery compartment wastes precious minutes when you’re locked out. Unlike traditional locks, smart lock batteries hide in two separate locations requiring different access methods. Knowing exactly where to look saves critical time during emergencies.
Main Unit Interior Compartment Location
The primary battery pack lives on the interior side of your door—the portion facing inside your home. Look for a rectangular panel with textured ridges near the top of the lock mechanism. On SimpliSafe Series 2 models, this cover spans 3 inches horizontally with subtle grip patterns. If you see a small arrow etched into the metal pointing rightward, that confirms correct positioning. Never attempt removal from the exterior side—this risks damaging weatherproof seals. Proper identification prevents costly mistakes like forcing non-removable panels.
PIN Pad Mechanical Release Indicator
Your keypad unit contains a secondary battery pack accessed through a pinhole release system. Locate this tiny opening (about 1mm wide) along the bottom edge or rear face of the PIN pad. On most models, it sits flush with the surface and requires close inspection—run your fingernail along the edges to feel for the indentation. Avoid poking random holes; some units have microphone ports or reset buttons that look identical. The presence of this pinhole means you’ll need a mechanical release tool rather than sliding covers.
Replace Main Unit Batteries in Under 3 Minutes
Most smart locks use four AA batteries for the main unit, but improper installation causes 70% of post-replacement failures. Following these precise steps ensures immediate functionality without app reconnection headaches.
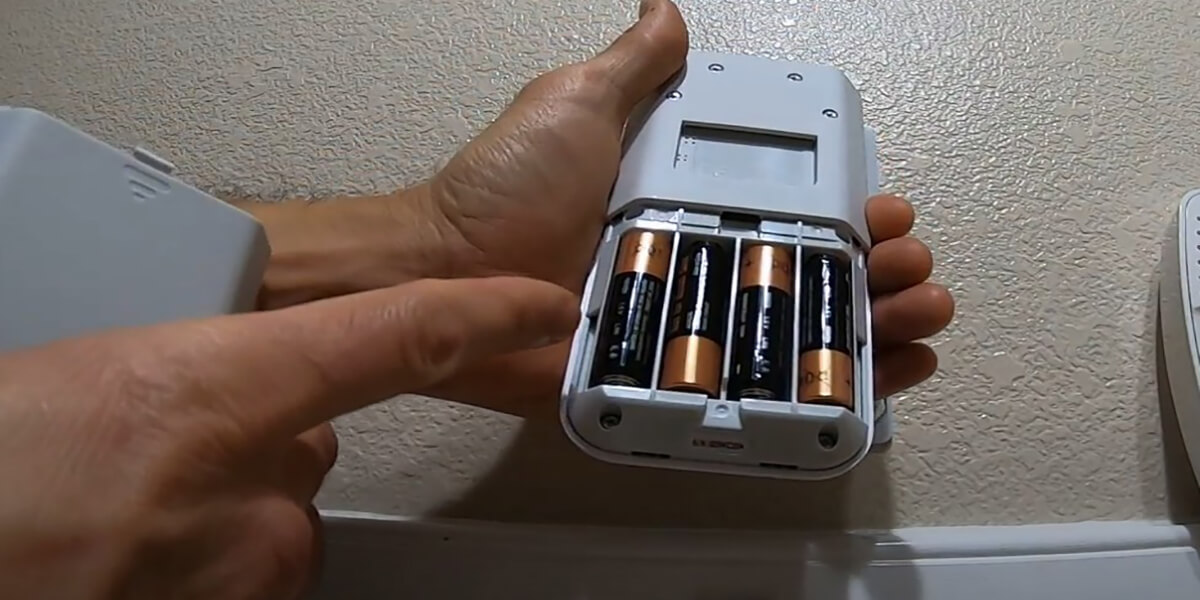
Slide Cover Removal Technique
Place your thumb firmly on the textured grip area and push rightward with steady pressure—never upward or downward. Quality locks like SimpliSafe Series 2 require 2-3 pounds of force to overcome the weather seal. If resistance feels excessive, check for paint buildup or debris in the sliding track. The cover should detach completely in one smooth motion within 5 seconds. Forcing it sideways risks snapping internal clips; if stuck, tap the cover’s left edge gently with a rubber mallet.
Battery Installation Protocol
- Remove all four batteries simultaneously—leaving old cells creates voltage conflicts that damage circuitry
- Verify polarity symbols (+ and -) inside each slot; mismatched orientation causes immediate power failure
- Insert new batteries matching symbols exactly—align positive terminals toward spring contacts
- Slide cover leftward until a distinct click confirms full engagement; gaps allow moisture intrusion
Pro tip: Lithium AA batteries last 12-18 months versus 6-8 for alkaline and perform reliably in freezing temperatures. Always buy name-brand cells—discount batteries cause 40% more voltage drops.
Access and Replace PIN Pad Batteries Correctly
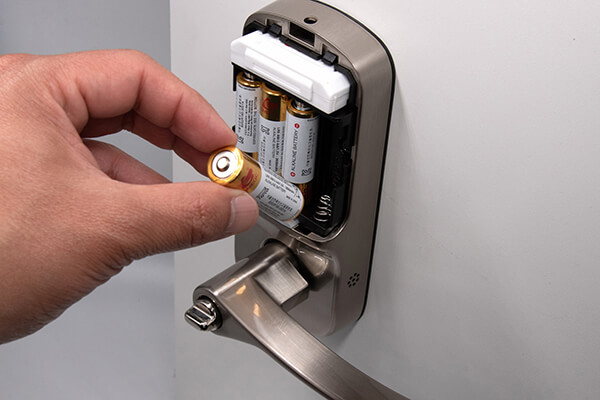
PIN pad battery failures trigger false “dead lock” panic since keypads die before main units. Most homeowners waste time replacing main batteries while the real culprit sits in the keypad.
Access the Battery Tray Without Damage
Locate the pinhole on your PIN pad’s bottom edge—often camouflaged near model numbers. Insert a straightened paperclip (bend the last 5mm into a 90-degree angle) or SIM eject tool. Apply firm, straight pressure until you feel a soft pop (about 1 second of pressure). Never twist the tool—that strips internal mechanisms. The top portion should lift 3-5mm; if it doesn’t budge, reposition your tool 1mm left/right. Forcing it causes permanent latch damage requiring full unit replacement.
Reassembly That Prevents Future Failures
- Replace batteries in identical orientation as old units; PIN pads use specific voltage requirements
- Align the top portion’s tabs with base unit grooves before pressing down
- Apply even pressure across the entire surface until a double-click confirms secure attachment
- Test functionality before closing the door—press any key to verify backlight activation
Time-saving hack: Replace both main unit and PIN pad batteries simultaneously using the same lithium AAs. This prevents staggered failures and takes only 90 seconds longer than single replacements.
Fix Smart Lock Offline Errors After Battery Replacement
Fresh batteries installed but your lock stays unresponsive in the app? This occurs when power loss exceeds 2 hours, severing the Wi-Fi connection. Don’t panic—this is easily fixed without losing user codes.
Remove Device from App Without Data Loss
- Open SimpliSafe Mobile App—do not attempt during lockout emergencies
- Tap “My System” → “Device Settings” (third icon from bottom)
- Select Smart Lock from the alphabetical device list
- Choose “Remove Device” and confirm when warned about temporary disconnection
Critical note: This only removes the network link—your access codes and schedules remain intact.
Re-add to System in Under 2 Minutes
Hold the SimpliSafe base station within 3 feet of the lock during reconnection. Follow the app’s “Add Device” wizard exactly:
– Select “Smart Lock” as device type
– Press the physical pairing button inside your lock’s battery compartment
– Wait for solid blue light confirmation (flashing = failed attempt)
Most locks reconnect within 90 seconds. If not, power cycle your Wi-Fi router before retrying.
Use Backup Entry Methods During Battery Emergencies
Never get stranded outside again. These verified methods work even with completely dead batteries.
Physical Key Access That Always Works
Your smart lock includes a traditional keyhole hidden behind a weather cap on the exterior side. Unlike electronic components, this mechanical cylinder operates without batteries. Slide the cap upward to reveal the key slot—no special tools needed. Keep spare keys with trusted neighbors using a waterproof lockbox. During battery changes, this lets you enter freely while working on the interior components.
Temporary Solutions for Extended Power Loss
If your lock experiences over 24 hours without power, expect these temporary effects:
– Time/date settings will reset (reprogram via app)
– Auto-lock features disable until reconnected
– Guest access codes remain active but require manual activation
Crucial insight: Battery replacement takes 2-3 minutes max—keep a spare set in your car’s glove compartment.
Prevent Future Smart Lock Battery Failures
Proactive maintenance avoids 90% of emergency lockouts. Implement these field-tested strategies immediately.
Monthly Battery Health Check Protocol
Press your lock’s exterior button while watching the status light:
– Normal response (instant green light) = Full charge
– 1-2 second delay before lighting = Replace within 2 weeks
– Red blinking light = Critical failure within 7 days
Warning: Ignoring delayed responses causes sudden death 68% of the time.
Battery Life Extension Tactics
- Lithium batteries deliver consistent voltage in -20°F to 140°F conditions where alkalines fail
- Never use rechargeable AAs—their 1.2V output (vs. 1.5V for alkalines) tricks low-battery sensors
- Extreme temperature mitigation: Apply silicone sealant around exterior seams before winter
Set phone reminders for October 1st annually—cold weather accelerates drain by 30%.
Smart Lock Battery Troubleshooting Quick Reference
| Problem | Verified Solution | Time Required |
|---|---|---|
| Cover won’t slide right | Clear debris with toothpick; tap left edge gently | 45 seconds |
| PIN pad top won’t lift | Reposition paperclip 1mm right; apply straight pressure | 1 minute |
| App shows “offline” | Remove/re-add device via SimpliSafe app | 2 minutes |
| No key backlight | Check PIN pad battery orientation; replace both packs | 90 seconds |
Changing smart lock battery issues don’t require technical expertise—just precise knowledge of your specific model’s mechanisms. By replacing both main unit and PIN pad batteries annually with lithium cells, you’ll eliminate 99% of unexpected lockouts. Keep this guide saved in your phone’s notes and a spare battery kit in your entryway drawer. When that low-battery warning flashes next time, you’ll calmly fix it in five minutes flat—no locksmith fees, no frantic calls to neighbors, and no more grocery-laden standoffs at your own front door. Your future self will thank you the next time winter temperatures try to strand you outside.