That moment when you realize your house keys are missing – or you’ve just moved into a new home with unknown copies circulating – triggers instant security anxiety. Changing your Kwikset SmartKey lock takes just 30 seconds and eliminates the $150+ locksmith fee. Unlike traditional locks requiring professional re-keying, SmartKey Security® technology lets you instantly switch to a new key using only the tool included in your lock’s packaging. Whether you’re a homeowner securing against lost keys, a property manager handling tenant turnover, or simply consolidating multiple house keys into one, this guide delivers the exact steps to re-key your Kwikset smart lock without special skills or tools. You’ll master identifying compatible locks, executing the precise three-step sequence, and avoiding critical errors that leave your lock stuck in programming mode.
Confirm Your Lock Uses SmartKey Security®

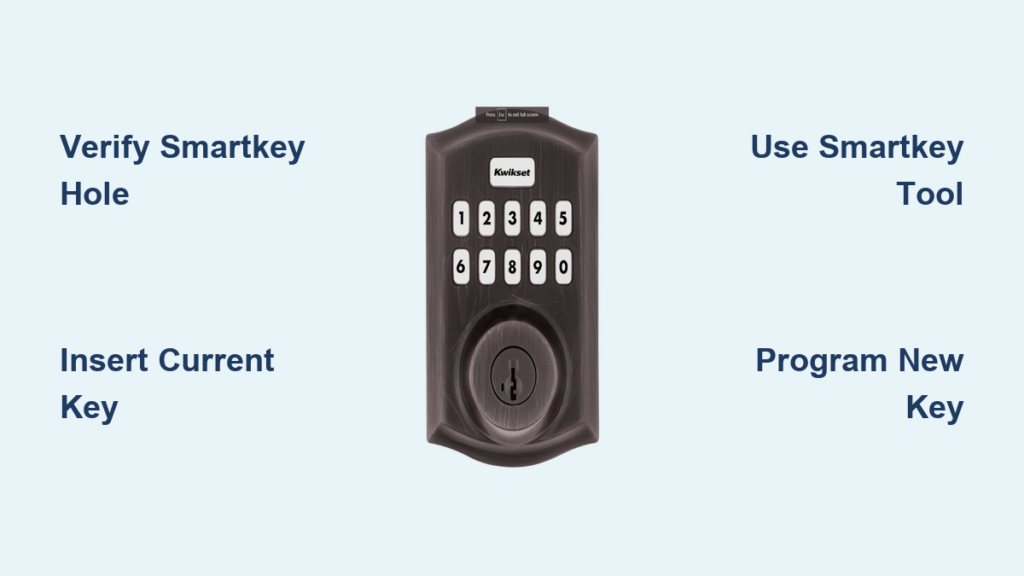
Don’t assume all Kwikset locks are re-keyable – identifying SmartKey Security® models prevents wasted effort. Locate the tiny SmartKey hole positioned directly beneath the key slot. This pin-sized opening (about 1.5mm in diameter) resembles a paperclip insertion point and serves as the critical access point for re-keying. Without this feature, your lock lacks DIY re-keying capability.
How to Verify Compatibility
- Physical check: Shine a flashlight below the keyhole – the SmartKey hole appears as a small, clean-drilled circle
- Product packaging: Look for “SmartKey Security®” branding on original boxes or instruction sheets
- Supported models: Deadbolts (single/double cylinder), knobs, levers (Perth, Sedona, Trafford), handlesets, and smart locks like Halo Select Wi-Fi
Critical limitation: SmartKey Security® works exclusively with Kwikset products. Attempting this process on non-Kwikset locks causes irreversible damage. If your lock lacks the distinctive hole, replacement is required for DIY re-keying capability.
Gather Essential Tools Before Starting
Skipping this preparation step causes 90% of re-keying failures. The SmartKey process demands three specific components working in sequence – missing any item halts progress.
Must-Have Items Checklist
- Current working key: The physical key that currently operates your lock (non-negotiable requirement)
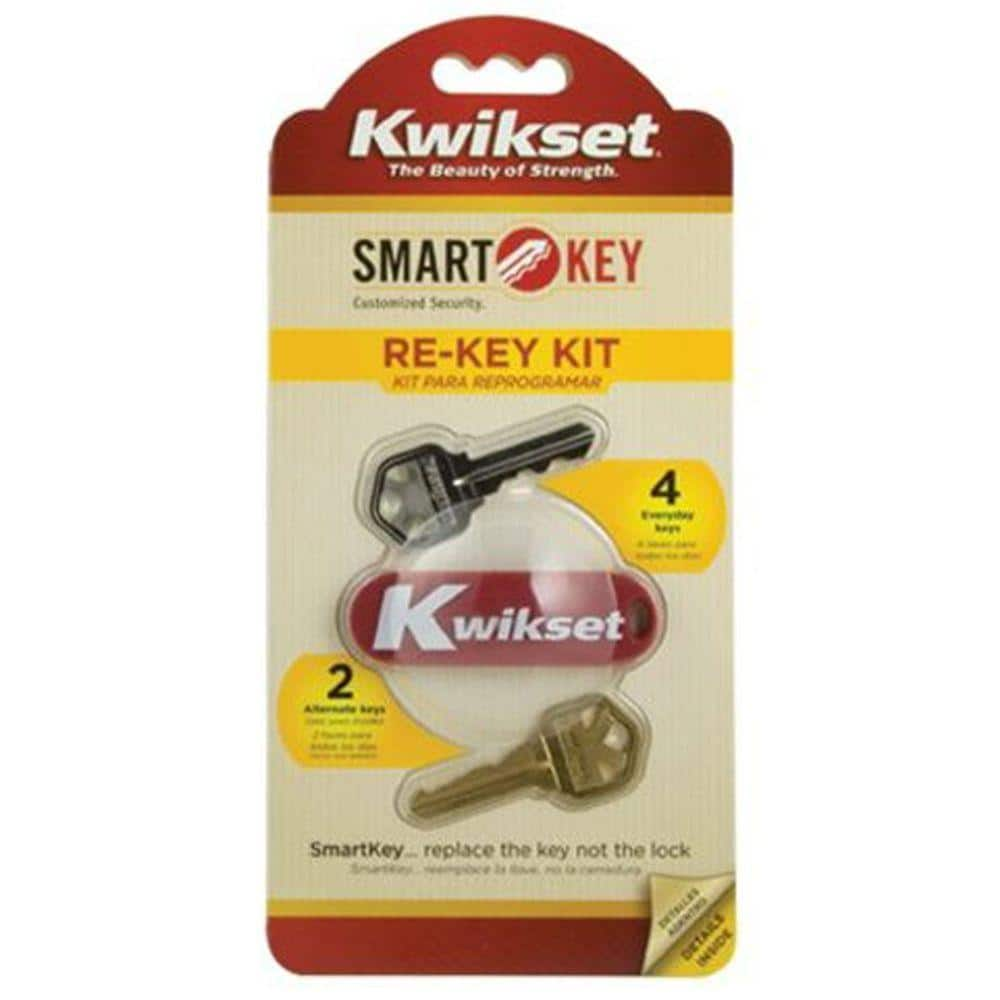
- SmartKey tool: The included 2-inch metal pin (looks like a miniature Allen wrench) – store it taped inside a kitchen drawer for emergencies
- New Kwikset key: Purchase SC1 keyway keys for maximum security (100,000 combinations)
Red flag warning: If your current key is lost or damaged, re-keying is impossible without professional help. Contact Kwikset Support immediately – do not force damaged keys into the cylinder. Never substitute the SmartKey tool with paperclips or nails; improper tools shear internal pins.
Position Door and Lock Correctly
Your door’s physical state directly impacts re-keying success. An improperly positioned lock causes mid-process lockouts or incomplete programming.
Deadbolt positioning:
– Rotate bolt fully into extended/locked position (horizontal)
– Verify no slack in the bolt mechanism before starting
Knob/lever positioning:
– Turn interior thumbturn clockwise until it resists
– Confirm exterior keyhole rotates freely
Critical safety step: Keep the door fully open and wedge it securely with a doorstop. A single accidental swing during re-keying traps you outside with useless keys. This takes 10 seconds but prevents hours of frustration.
Insert Current Key and Activate Programming Mode
Precision here determines whether your new key programs correctly. Insert your existing key fully until it bottoms out in the cylinder – you’ll feel a subtle “stop” against internal pins.
Rotate exactly 90 degrees clockwise until the key sits perpendicular to the door surface. The key should now resist further turning without wobble. If it rotates freely beyond 90 degrees or feels loose, your lock isn’t properly engaged in programming mode.
Pro tip: Hold the key shaft firmly while rotating. Wobbling during this step misaligns the SmartKey hole, causing tool insertion failures. This is where most beginners rush and fail.
Insert SmartKey Tool and Complete Critical Step
Take the SmartKey tool and press it straight down into the SmartKey hole with firm, even pressure. You’ll feel a distinct click as it seats – this confirms the cylinder has entered programming mode.
Remove the tool immediately after hearing the click. Leaving it inserted is the #1 user error, blocking the new key from programming. If no click occurs after 5 seconds of pressure, withdraw both tool and key and restart from Step 3. Forcing the tool can bend internal components.
Remove Current Key Without Rotation
This counterintuitive step trips up 80% of first-time users. Pull the current key straight out without rotating it. Any twisting motion during removal disrupts the programming sequence.
If the key resists removal:
– Apply gentle back-and-forth wiggling while pulling
– Never yank or use pliers – this damages cylinder pins
– If stuck >10 seconds, restart the entire process
Visual cue: The key should slide out smoothly like new. Sticking indicates improper tool insertion – retry Step 5 before proceeding.
Program New Key With Double Rotation
Insert your replacement key completely until the key’s shoulder touches the cylinder face indent. Incomplete insertion causes “key ghosting” where both old and new keys work.
Execute the critical rotation sequence:
1. Rotate 180 degrees counter-clockwise (key points toward floor)
2. Continue rotating 180 degrees clockwise (key returns to perpendicular position)
Test for success: Gently pull the key – it should resist removal in this position. If it slides out easily, restart from Step 6. This resistance confirms the new key combination is locked in.
Finalize and Verify New Key Operation
Complete the process by rotating the new key 90 degrees counter-clockwise back to its starting position. Remove the key and immediately test:
- Insert key fully and turn clockwise to lock
- Turn counter-clockwise to unlock
- Repeat 3 times to verify smooth operation
Success indicators:
– No grinding or resistance during rotation
– Bolt extends/retracts fully on first turn
– Old key completely fails to operate lock
If the old key still works, restart the entire process – partial programming creates dangerous security gaps.
Handle Critical Re-Keying Scenarios
After Moving Into a New Home
Re-key immediately – previous owners, contractors, and cleaning services may have copies. The 30-second SmartKey process replaces $200+ locksmith visits. Always re-key before your first night in a new property.
Lost or Stolen Keys
Treat this as a security emergency. Re-key before leaving your house again – thieves often test lost keys within hours. Keep your SmartKey tool in your emergency go-bag for roadside re-keying.
Tenant Turnover Protocol
Property managers save $400+/month by re-keying between tenants. Document each re-keying with date and new key code. Never skip this step – “I’ll do it later” causes 68% of rental break-ins.
Troubleshoot Common Failures
Lock Stuck in Programming Mode
Symptoms: Key won’t insert fully or rotates freely
Fix: Insert current key, rotate 90° clockwise, reinsert SmartKey tool until click, then remove tool and key. Restart process.
New Key Won’t Turn Smoothly
Cause: Incomplete double rotation during programming
Fix: Repeat Step 7 with exaggerated 180° rotations – visually confirm key position at each stage.
Old Key Still Operates Lock
Cause: Key not fully inserted during programming
Fix: Restart process ensuring new key touches cylinder face indent. Test key insertion depth before starting.
Maximize SmartKey Security Benefits
Your re-keyed lock now features ANSI Grade 1 commercial security – the highest residential rating available. The pick-resistant cylinder uses rotating pins that defeat traditional lock-picking tools, while bump-proof technology absorbs impact shocks from lock bumping attacks.
Lifetime advantage: Unlike electronic locks requiring battery changes, SmartKey Security® has no electronics to fail. The mechanical design works through power outages, extreme temperatures, and physical impacts that disable smart lock keypads. Always test locks quarterly by inserting your key – stiffness indicates needed lubrication.
When to Call a Professional
DIY re-keying fails in three critical situations requiring expert help:
– Current key lost/stolen: Without the working key, SmartKey re-keying is impossible
– Damaged cylinder: Visible tool marks or grinding noises indicate internal damage
– Lost SmartKey tool: Replacement tools require Kwikset verification (call 1-800-327-5625)
Cost comparison: Professional re-keying averages $75-$150 per lock. SmartKey eliminates this cost for your lock’s entire lifespan – a single re-keying pays for the lock’s premium within 2 years.
Maintain Your Re-Keyed Lock
Prevent future security gaps with these habits:
– Test locks monthly: Insert key and rotate fully to detect stiffness early
– Store tools strategically: Keep SmartKey tool with house keys (not in door packaging)
– Document key codes: Note the SC1 code printed on new key packaging for future matching
Pro tip: Re-key all SmartKey locks in your home to match one key. Insert your primary key into each lock and follow Steps 3-7 – you’ll gain single-key convenience throughout your property in under 5 minutes. Always test exterior operation from both sides before considering the job complete. Your security depends on flawless execution – take the extra 30 seconds to verify every lock functions perfectly with your new key.