You’re standing at your front door with arms full of groceries, pressing your smart lock’s keypad repeatedly. No lights illuminate, no beeps respond, and your phone app shows “connection failed.” Your smart lock battery has died, and you’re locked out. This exact scenario happens to thousands of smart lock owners each year when low-battery warnings get ignored or the backup key ends up locked inside.
The panic is real—but don’t worry. Every major smart lock includes emergency access methods specifically designed for battery failure situations. This guide delivers the exact steps to regain entry when your smart lock battery dies, whether you’re stranded outside in the rain or simply forgot to replace batteries before your vacation.
Emergency 9V Battery Jumpstart That Actually Works

Locate Hidden Power Contacts on Your Lock
Most smart locks hide emergency power terminals in plain sight—typically two small metal contacts along the bottom edge of the keypad. Schlage, Yale, and Hornbill models position these contacts where you’d least expect them. Check the very bottom rim first, as this is where 85% of smart locks place emergency terminals. These contacts might look like tiny silver dots or small rectangular plates, often stamped with “+” and “-” symbols.
What to look for when hunting for contacts:
– Two metal points spaced precisely 1/4 inch apart
– Often positioned away from the main keypad area
– May have a subtle battery icon etched nearby
– Usually located on the front face but sometimes on the side
Connect 9V Battery for Instant Power Restoration
Don’t waste time fumbling—use this precise method to jumpstart your dead smart lock:
- Grab a fresh 9V battery (keep one in your car glove compartment year-round)
- Position correctly: Align the battery’s smaller terminal with the positive contact
- Apply firm pressure: Press the battery against both contacts simultaneously
- Wait 3-5 seconds: The lock needs time to recognize external power
- Enter your code immediately: Type your access code while maintaining contact
- Unlock before releasing: Turn the handle while the battery is still connected
Critical mistake to avoid: Removing the battery too soon. Many users lose power during step 5 because they lift the battery while entering their code. Keep firm pressure throughout the entire process—this provides only enough power for one unlock cycle.
When 9V Jumpstart Fails: Troubleshooting Checklist
If your lock stays unresponsive despite correct technique, run through this diagnostic checklist:
Battery issues:
– Test with a brand-new 9V battery (old spares may have depleted)
– Avoid rechargeable 9V batteries—they often lack sufficient voltage
– Check for battery expiration dates (batteries degrade over time)
Contact problems:
– Clean terminals with a pencil eraser to remove corrosion
– Wipe contacts with a dry microfiber cloth
– Ensure you’re pressing both contacts simultaneously
Timing adjustments:
– Some Hornbill models need 8-10 seconds of contact before responding
– Try holding the battery while someone else enters the code
Physical Key Override Access When Locked Out

Find Your Hidden Keyhole Immediately
Your smart lock almost certainly has a mechanical key override—most manufacturers hide it under a small cover. Check these unexpected locations first:
– Under the decorative faceplate (slide upward to reveal)
– Behind the thumb turn on the interior side
– Along the bottom edge of the exterior keypad
– Under a rubberized cover on the lock’s side
Pro tip: If you’re locked out right now, look for slight seams or color variations in the lock’s surface. Manufacturers often make the keyhole cover match the lock perfectly—run your fingernail along edges to detect hidden panels.
Key Storage Strategies That Prevent Future Lockouts
Since you’re reading this while potentially locked out, implement these storage solutions immediately after gaining entry:
– Neighbor network: Give a spare key to two trusted neighbors (not just one)
– Outdoor lockbox: Install a mechanical combination lockbox away from front door
– Workplace backup: Keep a key at your office in a secure location
– Family vault: Store with relatives within 15 minutes of your home
Never do this: Hiding keys under mats or in fake rocks. Burglars check these spots first—use proper lockboxes instead.
Interior Battery Replacement Method (When You Can Get Inside)
Gain Alternative Entry Without Damaging Property
If the 9V method fails and you lack your key, try these legitimate access points:
– Garage entry: Many homeowners forget their garage has separate access
– Basement windows: Often overlooked but provide easy access
– Sliding doors: Check if secondary entry points use traditional locks
– Pet doors: Some large pet doors can be temporarily widened for access
Critical note: Never force entry through windows or secondary doors—this creates security vulnerabilities. Call a trusted friend or family member with keys before resorting to physical entry methods.
Replace Dead Batteries Within 60 Seconds
Once inside, follow this lightning-fast battery replacement process:
1. Locate compartment: Usually on interior side (slide cover downward)
2. Remove old batteries: Note orientation using “+” and “-” markings
3. Install fresh batteries: Use all new batteries (never mix old and new)
4. Test before closing: Verify all functions work while cover is open
5. Secure compartment: Snap cover back into place firmly
Battery specifications cheat sheet:
– Schlage: 4 AA alkaline (replace every 6 months)
– Yale: 4 AA or 2 CR123A (model-dependent)
– Kwikset: 4 AA with quarterly replacement
– Hornbill: 4 AA or rechargeable pack (check model)
Prevent Future Battery Failures Before They Happen

Monthly Battery Monitoring System
Create this simple monitoring routine:
– First of each month: Press any keypad button to check response time
– Watch for slow reactions: Delays indicate declining battery power
– Test physical key: Ensure mechanical override still functions
– Check app notifications: Verify low-battery alerts are working
Warning signs most users miss:
– Keypad lights that flicker when pressed
– Unusual beeping patterns (3 short beeps = critical battery)
– Delayed auto-lock feature activation
– Fingerprint scanner requiring multiple attempts
Build Your Emergency Lockout Kit Today
Assemble this kit and store in your car’s glove compartment:
– Fresh 9V battery (replace quarterly)
– Small flashlight (for locating contacts in darkness)
– Printed copy of your access code
– Manufacturer’s emergency contact info
– Mini screwdriver set (for battery compartment access)
Pro tip: Tape the kit to your car’s underside—burglars rarely check there, and you’ll always have access even when stranded.
Advanced Troubleshooting for Extreme Situations
Extreme Weather Lockout Solutions
Cold weather battery failures:
– Breathe on the keypad to warm internal components
– Hold 9V battery against contacts for 10-15 seconds (cold slows power transfer)
– Rub hands together first to warm them before handling metal
Rainy day emergencies:
– Wipe contacts dry with clothing before attempting jumpstart
– Use your body as a shield while working on the lock
– Place spare key in waterproof container in your car
When All Methods Fail: Professional Help Options
Certified locksmith services:
– Most can bypass mechanical override in under 5 minutes
– Average cost: $75-$150 (cheaper than window replacement)
– Look for “smart lock certified” professionals in your area
Manufacturer emergency support:
– Schlage: 1-800-800-LOCK (24/7 emergency line)
– Yale: In-app live chat with technicians
– Hornbill: Priority support for app-connected locks
Long-Term Battery Solutions That Eliminate Lockouts
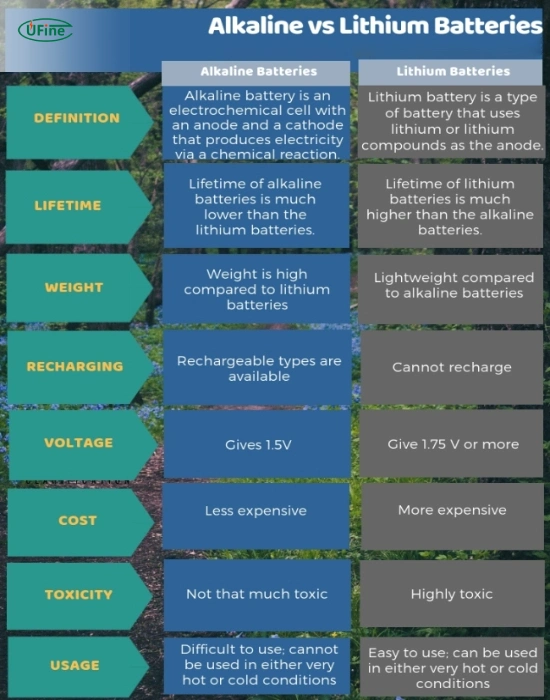
Upgrade to Lithium Batteries with Double Lifespan
Why lithium beats alkaline:
– Lasts 12-24 months versus 6-12 for alkaline
– Performs better in extreme temperatures
– Maintains consistent voltage until depletion
– Costs less per month despite higher upfront price
Installation tip: Replace all batteries simultaneously—mixing lithium and alkaline causes performance issues.
Smart Monitoring Technology That Alerts You First
Set up this notification system:
1. Enable all alert types in your lock’s app
2. Connect to smart home system for voice alerts
3. Create calendar reminders for battery checks
4. Add battery status to your morning routine
Pro feature: Some Yale models now send notifications when battery drops below 20%, giving you weeks to prepare.
Final tip: After any lockout incident, immediately replace all batteries—even if the lock seems to work. Partially depleted batteries can fail without warning, leaving you stranded again. Keep a labeled spare battery pack in your home for emergencies, and you’ll never face this frustrating situation twice.