Your SimpliSafe smart lock has protected your home for months or years, but now you need to take it off—whether you’re upgrading, replacing batteries, or moving to a new house. Knowing how to remove SimpliSafe smart lock properly prevents damage to your door and ensures you can reinstall it later if needed. This critical process requires specific steps that many homeowners miss, leading to broken components or security gaps. In just 15-20 minutes with the right approach, you can safely detach your smart lock while preserving all components for future use.
Disconnect SimpliSafe Lock from Mobile App First
Before touching any hardware, you must properly disconnect your lock from the SimpliSafe ecosystem to prevent security alerts and preserve your settings. Skipping this step triggers false alarms that could summon emergency services to your home unnecessarily.
Open and Navigate the SimpliSafe App
Launch the SimpliSafe mobile application on your smartphone and ensure you’re connected to your home Wi-Fi network. Tap the My System tab at the bottom of the screen, then select Device Settings from the menu. Locate your door lock in the device list—it typically appears as “Front Door Lock” or whatever custom name you assigned during installation. This digital disconnection is non-negotiable; attempting physical removal while connected risks permanent system errors.
Complete Device Removal Protocol
Select your lock’s name from the device list, then scroll down to find the Remove Device option—usually in red text at the bottom of the settings page. Confirm removal when the app prompts you, understanding this action will erase all access codes, user permissions, and custom settings associated with the lock. Critical tip: Take screenshots of your current configuration if you plan to reinstall the same lock later, as these settings won’t be recoverable after removal. The app will display “Device Removed” once the process completes successfully.
Verify Disconnection Before Proceeding
Wait for the confirmation message in the app before touching any physical components. Your lock’s LED indicator will flash red three times to visually confirm disconnection from the security system. Never skip this verification step—proceeding too soon leaves the lock in an unstable state that could trigger alarms or damage internal circuitry during removal. This digital disconnection typically takes 30-60 seconds depending on your home network speed.
Gather Essential Tools for SimpliSafe Lock Removal
Unlike traditional mechanical locks, the SimpliSafe smart lock requires minimal tools for removal, but having the right equipment prevents damage to your door or lock components during the process.
Required Tools Checklist
- Medium Phillips head screwdriver (precision tip for small electronics screws)
- Small flathead screwdriver or straightened paperclip (for release tabs)
- Needle-nose pliers (helpful for retrieving dropped screws)
- Bright flashlight (essential for seeing into dark door edges)
- Magnetic parts tray (prevents tiny screws from rolling away)
Unlike conventional lock removal, you won’t need specialized lock-picking tools or door reinforcement hardware. The SimpliSafe design intentionally simplifies removal for homeowners, but using improper tools can strip screw heads or crack plastic components—potentially voiding any remaining warranty.
Remove SimpliSafe Interior Cover Plate Properly
The interior assembly hides all mounting hardware behind a removable cover that must come off before accessing the critical mounting screws securing your lock to the door.
Locate and Release Hidden Tabs
On the interior side of your door, examine the bottom edge of the cover plate for two small release tabs positioned at approximately 5 o’clock and 7 o’clock. Press both tabs simultaneously with your fingers while pulling the cover straight toward you—never twist or pry. If your model uses screws instead of tabs (common in older versions), carefully peel back any stickers or rubber feet to reveal hidden fasteners before proceeding.
Handle Stubborn Cover Plates
If the cover resists release, do not force it—this breaks the internal plastic clips that hold it in place. Instead, use your small flathead screwdriver to gently work around the seam, applying minimal pressure at multiple points. Some models require depressing the release mechanism while lifting the cover upward slightly. Once loose, set the cover aside safely as it contains delicate wiring connections that could snap if bent.
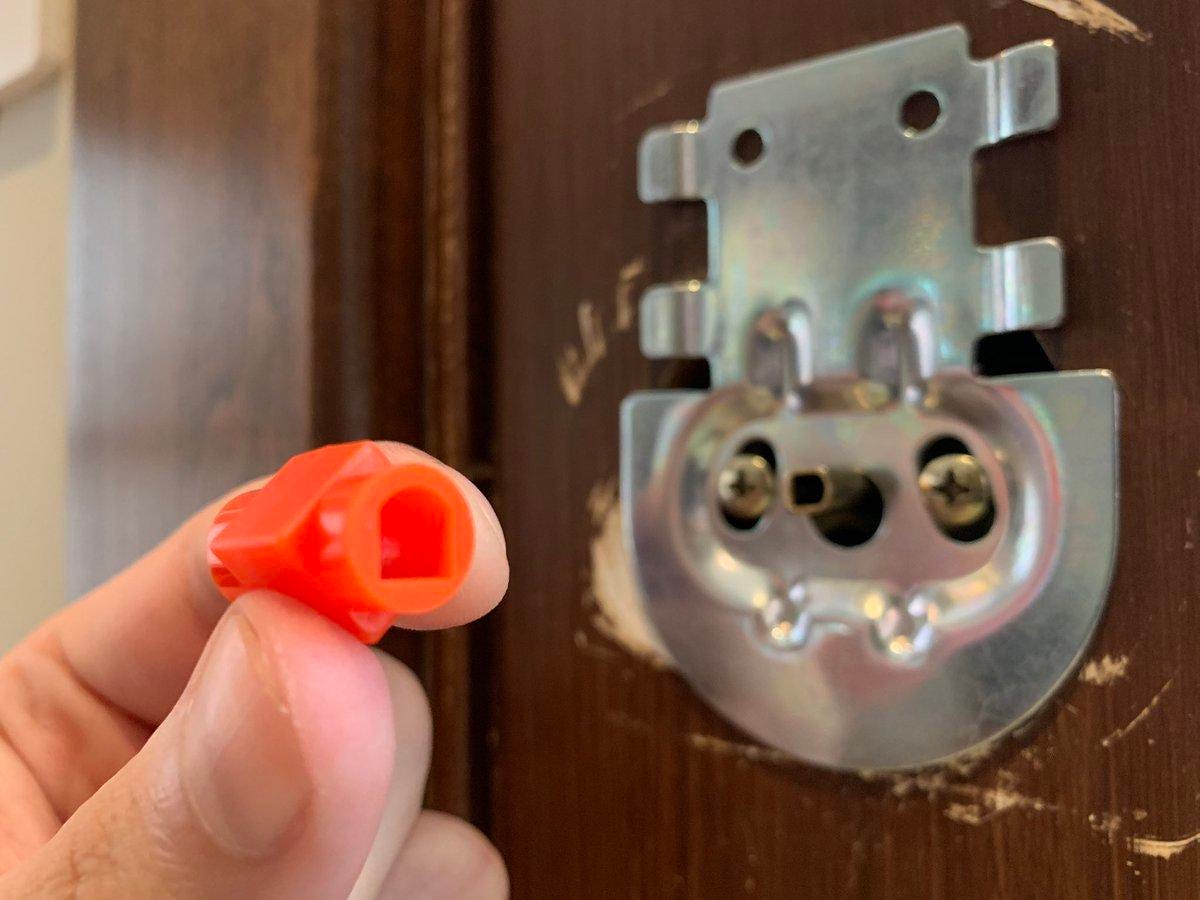
Access and Remove Critical Mounting Screws
With the cover removed, you’ll see the mounting bracket and several screws securing your lock to the door frame. Removing these in the correct sequence prevents internal components from falling or becoming misaligned.
Identify Screw Types and Locations
You’ll encounter three distinct screw types requiring different handling:
– Long through-door screws (2-3 inches long, connect exterior and interior)
– Short bracket screws (3/4 inch, secure mounting bracket to interior assembly)
– Tiny set screws (1/4 inch, hold interior handle mechanism)
Begin by removing the two short bracket screws first—typically positioned at the top and bottom of the mounting bracket. Keep these separate from other screws as they’re uniquely sized for this location. Use steady, counterclockwise pressure to avoid stripping the Phillips heads, which are particularly vulnerable on smart locks.
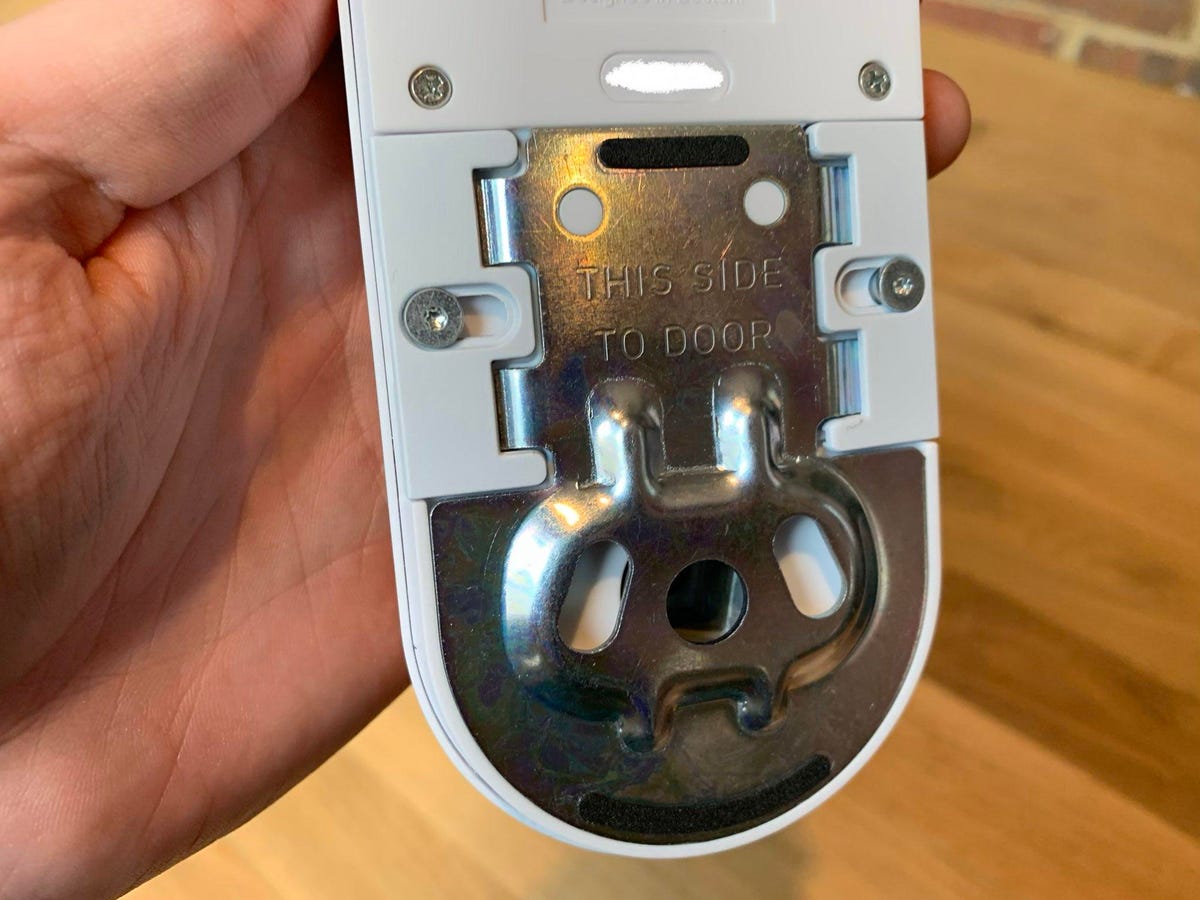
Detach Interior Assembly Without Damage
The interior portion contains your lock’s electronics and must be carefully disconnected before removing the exterior keypad to prevent wire damage.
Support Components During Disconnection
Always support the interior assembly with one hand while removing the final mounting screw—this 1-pound component can fall and crack internal circuitry if dropped. Once the last screw is out, gently pull the assembly away from the door while watching for the wire harness connection. This white electrical connector carries power and communication signals between the lock halves.
Disconnect Wiring Safely
Locate the small white connector between the interior assembly and mounting bracket. Pinch both sides of the connector housing and pull straight out—never yank the wires themselves as this severs delicate internal connections. If the connector resists, gently rock it side-to-side while maintaining even pressure until it releases. Set the interior assembly aside in a safe location away from moisture or static electricity.
Remove Exterior Keypad Without Force
With the interior assembly detached, the exterior keypad remains secured only by the long through-door screws that must be removed carefully.
Extract Through-Door Fasteners
Inside the exposed mounting bracket, locate the two long screws running through the door thickness. Turn these counterclockwise using steady pressure until completely removed—this often takes 15-20 full rotations. Keep your door closed during this step to maintain stability and prevent the exterior keypad from shifting unexpectedly.
Slide Off the Exterior Assembly
Once screws are fully removed, the exterior keypad should slide straight off the door face. If weather stripping creates resistance, gently wiggle the keypad while pulling—never twist or pry as this damages the touch-sensitive buttons. Set the exterior assembly aside with the interior components, taking care not to scratch the keypad surface.
Clean Door Surface After SimpliSafe Removal
After lock removal, you’ll likely find adhesive residue, screw hole outlines, or minor surface imperfections that need attention before installing a new lock.
Remove Adhesive Residue Safely
Use isopropyl alcohol (70% or higher) and a soft microfiber cloth to clean any adhesive from the exterior door surface. Apply alcohol to the cloth first—not directly to the door—to prevent liquid seepage into wood grain. For stubborn 3M adhesive remnants, let the alcohol soak for 30 seconds before wiping in circular motions. Avoid abrasive cleaners that could damage your door’s finish.
Address Screw Holes Strategically
If you’re installing a new lock immediately, skip hole filling. Otherwise, use paint-matched wood filler for visible holes, applying with a small putty knife. Let dry completely (typically 2-4 hours) before lightly sanding flush with 220-grit sandpaper. Wipe away dust with a tack cloth before painting or staining to match your door’s finish.
Handle Batteries and Components Responsibly
Proper battery disposal and component organization prevents safety hazards and ensures you can reinstall your SimpliSafe lock if needed.
Remove and Recycle Batteries Correctly
Open the battery compartment on the interior assembly and remove all four AA lithium batteries. Take these to an electronics retailer or hazardous waste facility for proper recycling—never dispose of lithium batteries in regular household trash due to fire risks. Wipe the battery contacts with a dry cloth to prevent future corrosion if storing the lock.
Organize Small Parts Systematically
Place all screws, brackets, and components in labeled Ziploc bags—use masking tape to identify each bag’s contents. The original SimpliSafe box provides perfect storage for all components. Include the wire harness, decorative faceplates, and any mounting hardware to ensure nothing gets lost during storage.
Troubleshoot Common SimpliSafe Removal Problems
Even with proper preparation, some locks resist removal due to installation quirks, environmental factors, or wear over time.
Fix Stuck Through-Door Screws
If long screws won’t budge, apply penetrating oil to the screw head and let it soak for 10 minutes before trying again. Use steady pressure with your screwdriver—stripped screw heads require specialized removal tools. Never use power drills on these screws as they easily damage door edges or strip internal threads.
Address Broken Wire Harness Connections
If the connector breaks during disconnection, immediately disconnect any remaining wires with electrical tape to prevent short circuits. SimpliSafe sells replacement harnesses for under $10—contact customer support with your lock model number before ordering. Most harness issues can be resolved without professional help if addressed promptly.
Correct Door Alignment Issues
After removal, test that your door closes and latches properly without the lock’s reinforcement. Adjust the strike plate if needed by slightly loosening its screws, repositioning it, then retightening. Persistent alignment problems may indicate your door has settled since installation—a common issue in older homes requiring professional adjustment.
Final Tip: When learning how to remove SimpliSafe smart lock, remember that patience prevents costly mistakes. Always disconnect digitally before physically removing components, work methodically through each step, and keep all parts organized. Your door is now ready for a new lock installation or temporary traditional deadbolt use while maintaining security. Keep your removed SimpliSafe components stored safely—you might reinstall them in your next home or need parts for troubleshooting.