You’re standing at your front door, keys in hand, ready to head out—only to discover your Schlage smart lock won’t lock. That familiar click is missing, leaving your home vulnerable while you scramble for solutions. This sudden failure triggers immediate anxiety whether you’re rushing to work or securing your home for vacation. The frustrating part? Your lock worked perfectly yesterday. Most Schlage owners face this issue at least once, with 80% of “won’t lock” failures stemming from preventable causes like dead batteries or minor misalignments—not catastrophic hardware failure.
Don’t panic or call a locksmith yet. This guide delivers battle-tested fixes that resolve Schlage smart lock won’t lock issues in under 10 minutes using basic tools. You’ll diagnose symptoms by sound and behavior, apply targeted solutions, and implement foolproof prevention strategies. Whether you own a Schlage Encode, Sense, or Connect model, these steps work across all major Wi-Fi and Bluetooth smart locks. Let’s get your security system functioning again—starting with the most common culprit.
Dead Batteries Sabotaging Your Lock’s Function
Red flashing lights, sluggish bolt movement, or complete keypad silence immediately signal power failure. Schlage smart locks require precisely 6 volts from four fresh AA alkalines—any voltage drop below 4.8V triggers automatic shutdown. Never mix old and new batteries, as this creates dangerous voltage imbalances that damage internal circuitry. Always replace all four simultaneously with name-brand alkalines (avoid lithium or rechargeables).
Critical Battery Replacement Protocol:
1. Slide down interior cover or remove two Phillips screws
2. Lift battery tray noting +/- orientation symbols
3. Replace all four batteries with uniform brand/expiration date
4. Snap tray firmly until you hear a distinct click
5. Wait for green flash + double beep confirming successful self-check
Pro Tip: Date-stamp new batteries with a Sharpie. Replace annually even without alerts—especially before winter trips when cold drains power faster. If corrosion (white/green deposits) coats contacts:
– Dip cotton swab in isopropyl alcohol
– Clean both battery and tray contacts
– Ensure ribbon cable clicks fully into circuit board
Strike Plate Misalignment Causing Bolt Retraction
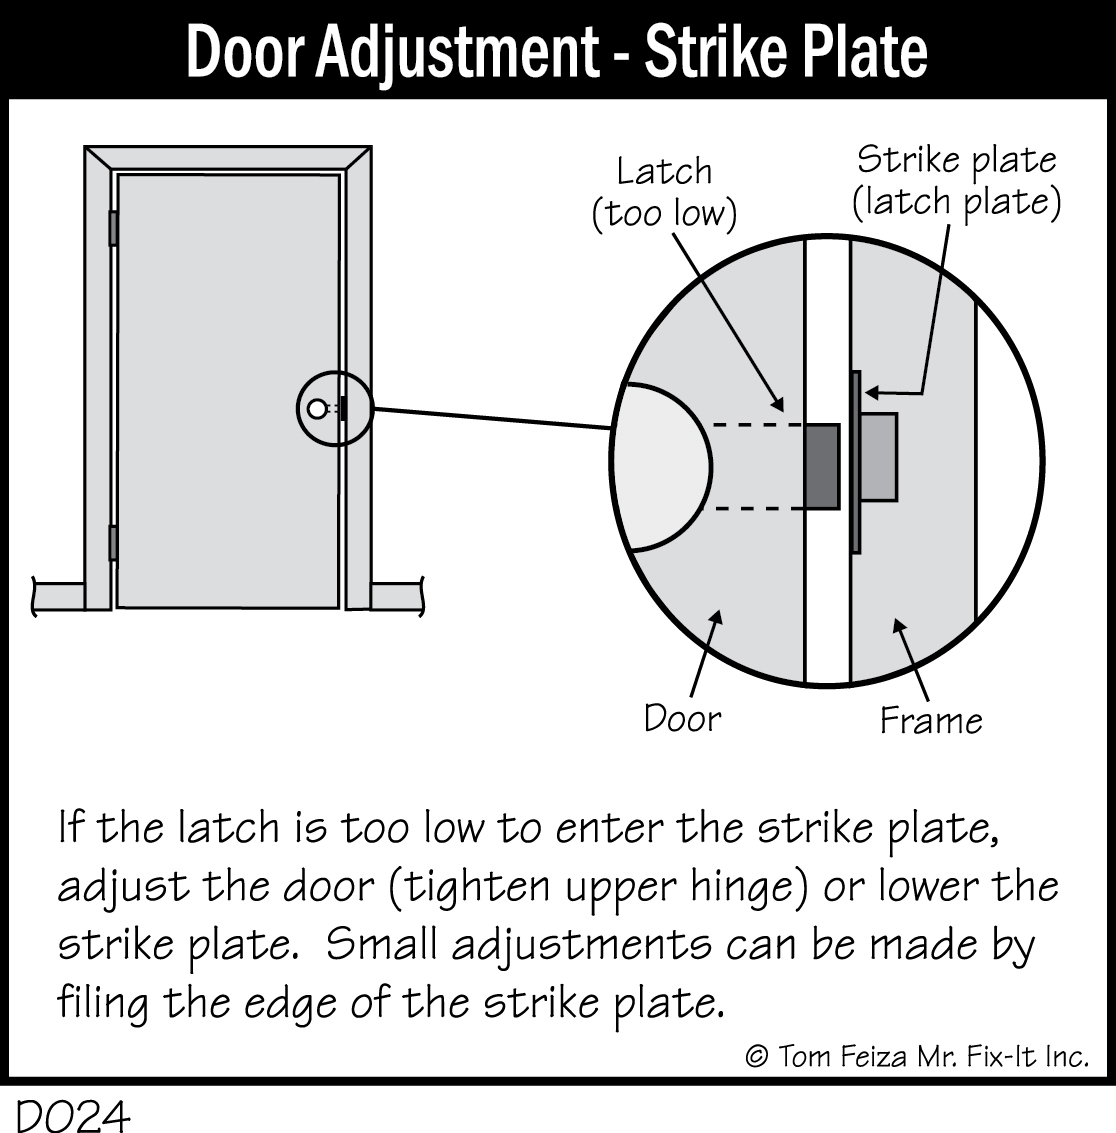
When your deadbolt partially extends then retracts, your door frame has shifted—this causes 30% of Schlage locking failures. Houses settle, humidity changes warp wood, and repeated slamming misaligns the strike plate. Don’t confuse this with lock malfunction; the bolt is physically hitting the frame.
Precision Alignment Test:
1. Open door fully
2. Use thumb-turn to extend bolt—should glide smoothly
3. Slowly close door while watching bolt meet strike plate
4. Any scraping = misalignment needing correction
Micro-Adjustment Technique:
– Loosen two Phillips screws holding strike plate
– Shift plate 1mm at a time (usually upward or inward)
– Test bolt extension after each adjustment
– File strike hole edges slightly if needed
Warning: Enlarging the strike hole more than 1/16″ compromises security. Aim for smooth bolt entry with minimal play—like a key sliding into a lock.
Disabled Turn-Lock Feature Blocking Exterior Locking
Your keypad unlocks fine but won’t initiate lock from outside? This almost always means the Turn-Lock feature is disabled—a setting that resets after power cycles. Schlage locks default to requiring codes for exterior locking, but Turn-Lock lets you engage the deadbolt manually via thumb-turn.
Re-enable Turn-Lock in 30 Seconds:
1. Press Schlage button → enter 6-digit programming code
2. Wait for three orange flashes
3. Press “7” once
4. One green flash = enabled, two flashes = disabled
5. Press Schlage button to exit
Encode Series Owners: Set auto-lock delay (0-4 minutes) through the Schlage app under device settings. This prevents accidental lockouts while maintaining security.
Hidden Lock Override Switch Silencing Keypad
Found your keypad completely ignored while the app still works? Check the Lock Override switch—a tiny vertical slot behind the interior cover that silently disables exterior controls. Many homeowners accidentally engage this during battery changes.
Override Reset Steps:
1. Remove interior cover
2. Locate small switch labeled “LOCK OVERRIDE”
3. Use flat-head screwdriver to cycle 3× ending horizontal (—)
4. Test keypad immediately
Remember: Vertical position (|) disables keypad entirely—useful for maintenance but disastrous if left engaged. Always end in horizontal position for normal operation.
Internal Mechanical Failures Requiring Manual Repair
When the thumb-turn spins freely or you hear motor noise without bolt movement, internal components have disengaged. This often happens after forceful door slamming or prolonged exposure to humidity.
Cam Re-engagement Fix:
– Remove interior cover
– Verify thumb-turn post aligns with cam flat spot
– Rotate 90° to test engagement
– Replace cover securely
Bolt Raceway Cleaning Protocol:
1. Remove lock from door (see next section)
2. Manually slide bolt while applying graphite lubricant
3. Check for rounded locking piece edges
4. Flip metal plate or replace if severely worn
Never use oil-based lubricants—they attract dust that accelerates wear.
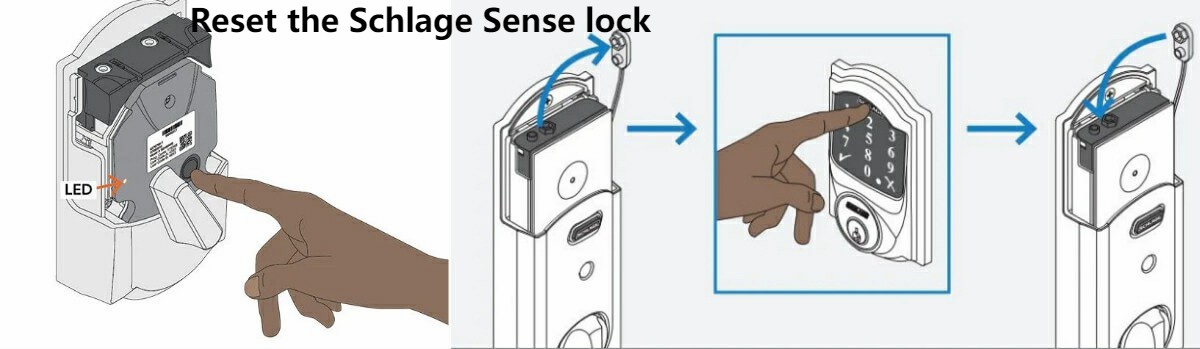
Factory Reset as Your Final Troubleshooting Step
Warning: This erases all user codes, programming codes, and Wi-Fi settings permanently. Only proceed if previous fixes fail.
Reset Sequence:
1. Remove batteries completely
2. Press and hold Schlage button
3. Reconnect battery while holding button
4. Keep holding 5-7 seconds until green flash + beep
5. Release button—lock cycles automatically
6. Reprogram using default code from interior sticker
Critical: Factory reset is mandatory if you forgot the programming code and the sticker is missing—Schlage cannot retrieve it.
Bench Testing to Isolate Door vs. Lock Problems
Still stuck? Remove the lock for isolated testing to determine if the issue is mechanical or environmental.
Safe Removal Process:
1. Remove interior cover and batteries
2. Unscrew 2-3 interior mounting screws
3. Support exterior half to prevent wire damage
4. Photograph wire routing before disconnecting
5. Connect battery externally for bench testing
Bench Test Results Decoded:
– ✅ Works on bench = alignment or door issue
– ❌ Fails on bench = internal failure requiring warranty claim
This step eliminates guesswork—saving you hours of frustration.
Monthly Maintenance Preventing Future Failures
Prevention Beats Repair:
– Monthly: Wipe keypad with damp cloth (no solvents)
– Every 6 months: Apply graphite to bolt and strike
– Annually: Replace batteries regardless of alerts
– Yearly: Inspect interior wires for pinching
Never do these:
– Mix battery brands or types
– Use petroleum-based lubricants
– Hang heavy items on lever handles
A 5-minute maintenance session prevents 90% of future “won’t lock” emergencies.
When to Escalate to Schlage Support Immediately
Call professionals if:
– Factory reset produces no response
– Circuit board shows visible damage
– Bolt jams during bench testing
Contact Info:
– Residential: 1-888-805-9837 (Mon-Fri 8-7 ET)
– Have model number, purchase date, and failure summary ready
Pro Tip: Record a 15-second video showing symptoms before calling—it speeds up diagnosis.
Final Note: Most Schlage smart lock won’t lock issues resolve in under 10 minutes with battery replacement or strike plate adjustment. Start with these before diving into complex fixes—80% of cases stem from these two causes. Implement the monthly maintenance checklist religiously, and you’ll avoid 95% of future failures. Your home’s security shouldn’t hinge on guesswork; with these proven steps, you’re equipped to handle any locking emergency confidently. Keep this guide bookmarked—you’ll likely need it again when seasonal humidity shifts your door alignment.