The deadbolt won’t budge, the app shows a red battery icon, and you’re standing outside with grocery bags in both hands. This frustrating scenario happens to smart lock owners who didn’t learn how to charge smart lock systems properly. Modern smart locks typically last 3-6 months per charge, but improper charging practices can cut that time in half. This guide reveals the exact charging procedures, troubleshooting methods, and maintenance tips you need to keep your smart lock operational year-round.
Identify Your Smart Lock Power Type
Check Battery Specifications First
Smart locks use three main power systems: rechargeable lithium-ion batteries (4000mAh-10000mAh), disposable AA batteries, or hardwired connections. Your lock’s companion app reveals the power type—rechargeable models show precise percentage levels while disposable battery models display simple bars. Modern locks with USB-C ports almost always use rechargeable lithium-ion packs that deliver 3-6 months of operation under normal use.
Pro tip: Open your lock’s app right now. If you see a percentage number (like “78%”), you have a rechargeable system. If you see battery bars or “low battery” warnings without percentages, you likely use disposable batteries.
Locate Charging Port Location
USB-C ports dominate new smart locks, typically hidden beneath weather-resistant flaps at the bottom or rear of the unit. Legacy models use micro-USB on the side or bottom, while wireless charging models require complete removal from the door. Solar-powered outdoor locks feature visible panels above the keypad that need direct sunlight exposure.
Critical detail: Shine a flashlight directly onto your lock tonight. The charging port location becomes obvious with direct light, saving future fumbling in the dark when you’re locked out.
USB-C Charging Steps (Most Common)
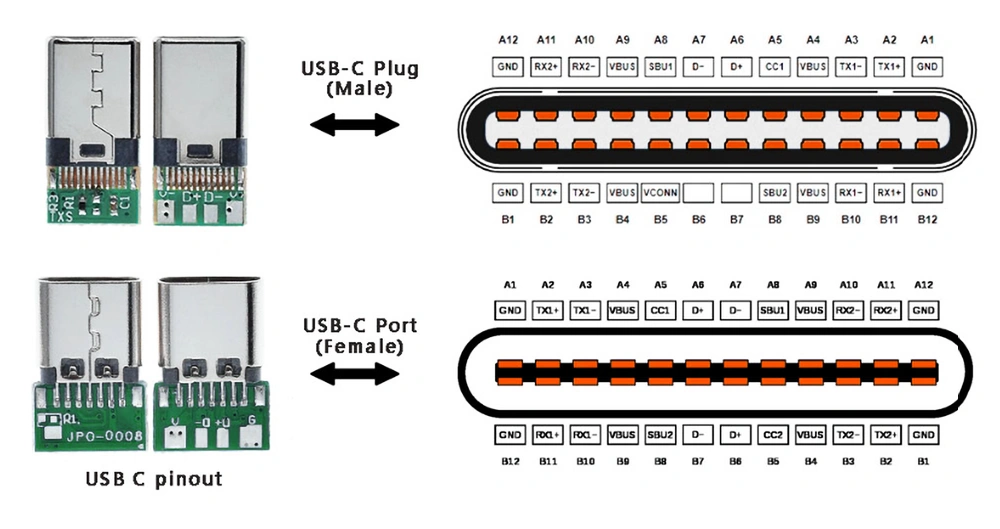
Connect Cable Correctly
Modern smart locks with USB-C charging follow a simple but specific protocol:
– Use the provided cable or certified USB-C equivalent (avoid cheap knockoffs)
– Connect to 5V/1A or 5V/2A wall adapter (not computer USB ports)
– Insert firmly until flush—proper cables click into place
– Your lock remains fully functional during charging
Time estimate: Allow 2-4 hours for complete battery restoration. The LED indicator turns solid red during charging, switching to solid green when complete. Never disconnect before the green light appears—partial charges degrade battery health over time.
Monitor Charging Progress
Your lock communicates through multiple channels:
– LED signals: Red (charging), green (complete), blinking orange (connection issue)
– App notifications: Real-time percentage display with completion estimates
– Voice updates: “Alexa, check front door battery” provides instant status
Common oversight: Don’t rely solely on LED indicators. App notifications catch charging errors LED lights might miss, like slow charging from weak power sources.
Fix Micro-USB Legacy Models

Legacy Charging Process
Older micro-USB locks require similar steps with longer timelines:
– Micro-USB cables must support data transfer (cheap cables often fail)
– Charging takes 3-5 hours versus 2-4 for USB-C
– Port orientation matters—micro-USB only inserts one way
– Battery access often requires removing lock from door
Critical difference: Micro-USB locks typically disable automatic locking during charging as a safety feature. Manually secure your door until charging completes.
Troubleshoot Common Issues
When legacy locks refuse to charge:
– Test cable with another device first
– Clean port gently with toothpick—not metal objects
– Try different wall adapter (avoid computer USB ports)
– Check for bent pins inside micro-USB connector
Wireless and Solar Charging Methods
Qi Wireless Charging Setup
Premium models with wireless charging require specific positioning:
– Remove lock completely from door mounting
– Center lock’s charging coil on Qi pad marked zone
– Use 5W-10W wireless charger—not phone fast chargers
– Complete charge takes 4-6 hours due to efficiency losses
Location matters: Wireless charging works best on non-metallic surfaces. Kitchen counters work; metal entry tables don’t.
Solar Panel Maintenance
Outdoor locks with solar trickle charging need attention:
– Position lock to receive 6-8 hours direct sunlight daily
– Clean solar panels monthly with soft cloth
– Expect supplemental charging—not primary power source
– Monitor backup battery levels during cloudy weeks
Winter reality: Solar charging drops 60-70% during short winter days. Establish monthly charging routine regardless of solar capability.
Decode Charging Indicator Lights
LED Color Meanings
Smart lock LEDs follow universal patterns:
– Solid red: Actively charging (normal)
– Solid green: 100% charged (disconnect now)
– Blinking red: Below 20% battery (charge within 24 hours)
– Blinking orange: Charging error (check connection)
App Alert Interpretation
Beyond simple lights, apps provide nuanced information:
– “Charging slowly” = weak power source or cable issue
– “Battery health declining” = time for replacement
– “Temperature too high/low” = move lock indoors before charging
Temperature warning: Charging below 32°F or above 95°F permanently damages batteries. Bring locks indoors during extreme weather.
Diagnose Charging Failures

Lock Won’t Charge
Systematic troubleshooting eliminates guesswork:
1. Verify cable clicks firmly into port
2. Test cable with phone—cheap cables often fail
3. Check port for pocket lint or debris
4. Try different wall outlet (avoid power strips)
5. Confirm adapter outputs 5V/1A minimum
Quick test: If your cable charges your phone but not the lock, the lock’s charging circuit may need service.
Slow Charging Solutions
When 2-hour charges become 6-hour marathons:
– Switch to high-quality, data-rated USB cable
– Connect directly to wall adapter—not computer USB
– Close companion app during charging (reduces background drain)
– Disable WiFi connectivity temporarily via app settings
Pro tip: Background app refresh drains 15-20% more power during charging. Force-close the app for faster results.
Emergency Power Backup
9V Battery Jump Start
When primary battery dies completely:
1. Locate 9V emergency terminals (usually under rubber cover)
2. Connect 9V battery observing polarity markings
3. Enter access code within 10 seconds of connection
4. Replace or recharge main battery immediately
Practice this: Test emergency access quarterly. Dead batteries always strike at the worst possible moment.
Portable Power Bank Alternative
USB power banks provide temporary operation:
– Any 5V power bank works (10,000mAh recommended)
– Connect via charging port while leaving lock mounted
– Provides 24-48 hours of normal operation
– Useful during extended power outages
Prevent Future Charging Issues
Establish Charging Schedule
Create foolproof routines:
– Charge when app shows 25% remaining
– Set monthly calendar reminders
– Track charging dates in app notes
– Avoid waiting for low battery warnings
Optimize Battery Lifespan
Extend battery life through smart habits:
– Update lock firmware quarterly (includes battery optimizations)
– Disable unnecessary features like constant WiFi
– Clean charging contacts with isopropyl alcohol monthly
– Store spare batteries at 50% charge, not full
Temperature control: Indoor locks last 40% longer than outdoor installations. Consider location changes during extreme weather.
Manufacturer-Specific Protocols
August Lock Charging
August models feature removable battery packs:
– Micro-USB charging takes 4 hours
– CR123 backup batteries maintain function during charging
– Battery icon appears on app home screen
– Never force battery pack removal—slide gently
Yale Assure Lock Details
Yale locks hide charging under weatherproof covers:
– USB-C port requires lifting rubber seal
– 3.5-hour charge time from empty
– Emergency 9V terminals located beneath keypad
– Professional installation often required for battery replacement
Schlage Encode Exception
Schlage Encode uses disposable batteries exclusively:
– Requires 4 AA batteries (not rechargeable)
– 6-12 month battery life typical
– Low battery alerts via email and app
– 9V emergency terminals for dead battery situations
Important distinction: Schlage Encode owners never “charge”—they replace. Don’t attempt to recharge AA batteries.
Safety During Charging
Electrical Precautions
Protect your investment and safety:
– Use only manufacturer-approved charging accessories
– Avoid charging during electrical storms
– Unplug immediately if cable feels hot
– Inspect cables monthly for damage or fraying
Physical Safety Measures
Prevent common charging accidents:
– Never force connectors—proper cables slide in smoothly
– Allow locks to cool 10 minutes after heavy use before charging
– Keep charging ports covered when not in use
– Store cables away from heat sources and pets
Warranty protection: Document any charging issues with photos. Manufacturers often replace locks under warranty for charging circuit failures.
Mastering how to charge smart lock systems properly transforms battery anxiety into confidence. Charge proactively at 25% battery, use quality cables, and establish monthly check-ins with your lock’s app. Your future self—standing at the door with arms full of groceries—will thank you for this simple discipline. Remember that consistent maintenance prevents 90% of smart lock failures, keeping your home secure without the frustration of unexpected battery depletion.
