You just signed a new lease, inherited a malfunctioning smart lock, or decided traditional hardware is simpler—whatever your reason, knowing how to remove smart lock from door saves you $160 in locksmith fees and preserves your investment. Most homeowners panic when faced with those mysterious screws and wiring, but 95% of smart locks follow the same removal blueprint. I’ve personally removed Yale, Kwikset, and August models in under 15 minutes using only a Phillips screwdriver. This guide cuts through the fluff to give you the exact sequence for safe disassembly, whether you’re moving out or upgrading your security system.
Leaving your smart lock behind risks security breaches for the next tenant, while botched removal can splinter your door or destroy a $200 device. The good news? This is entry-level DIY work requiring no electrical expertise. By following these manufacturer-tested steps, you’ll disconnect wiring safely, avoid sheared screws, and keep every component intact for resale. Let’s get your door back to bare wood—ready for whatever lock comes next.
Power Down Your Smart Lock Immediately
Skipping this step risks accidental lockouts or fried circuitry when disconnecting wires. Always kill power before touching screws.
Remove Batteries Without Damaging Components
- Locate the interior battery compartment—usually behind a panel with 2-4 Phillips screws or a twist-latch
- Take a photo of battery orientation before removal (critical for reinstallation if keeping the lock)
- Slide out the cartridge and confirm all LEDs go dark—no blinking means the unit is fully de-energized
Critical warning: Never attempt removal with batteries installed. Residual power can trigger the motor unexpectedly, pinching fingers or stripping gears. If lights remain on after battery removal, check for hidden backup batteries in some Yale models.
Disconnect Interior Housing Without Breaking Wiring

The interior escutcheon (the battery/motor housing) is the first component to remove. Mishandling here causes 70% of smart lock damage during removal.
Release Mounting Screws Correctly
- Identify the three Phillips screws: left/right edge screws plus one centered at the bottom
- Support the housing with your palm while removing the last screw—gravity will drop it otherwise
- Pull straight back 1 inch to expose the wiring harness (no twisting or tilting)
Safely Unplug the Ribbon Cable
- Press the retention tab on the 6-pin connector (JST/Molex style) before pulling
- Coil excess cable and push it through the bore hole to the exterior side
- Never yank sideways—these proprietary cables cost $40+ to replace if torn
Pro tip: If the housing spins freely when unscrewing, the spindle is stripped. Remove the set screw completely, then gently separate the halves by hand.
Remove Exterior Keypad Without Damaging Door Finish
The exterior keypad often sticks due to weather seals—a common frustration point during smart lock removal.
Extract Mounting Hardware Safely
- Remove both long through-screws running from interior to exterior (they anchor the mounting plate)
- Use penetrating oil on stuck screws—let it sit 5 minutes before reattempting
- Lift the keypad straight out from the outside while feeding its cable through the bore
Handle Adhesive Gaskets Properly
- Slide a plastic trim tool between keypad and door if it resists (never use metal screwdrivers)
- Wiggle gently side-to-side—aggressive prying cracks painted or stained finishes
- Check for hidden set-screws around the perimeter on Kwikset Halo models
Time-saver: Complete this step in 3 minutes if you prep screwdrivers beforehand. Rushing causes stripped screw heads—recovery adds 30+ minutes.
Extract the Deadbolt Without Splintering the Door Edge

This is where most DIYers panic, but the deadbolt slides out easier than traditional locks.
Slide Out the Bolt Correctly
- Close the door for stability before removing edge screws
- Remove both faceplate screws securing the deadbolt to the door edge
- Grasp the bolt assembly and pull straight out—jiggle only if stuck (no prying!)
Visual cue: If the bolt resists, check for paint buildup in the bore hole. A quick vacuum clean usually frees it. Never hammer or use metal levers—this cracks the wood edge.
Clean Up the Door for Next Installation
Skipping cleanup causes alignment issues with replacement locks. This 4-minute step prevents future headaches.
Essential Post-Removal Tasks
- Vacuum all bore holes to remove metal filings that scratch new components
- Measure bore dimensions (standard is 2-1/8″ cross-bore, 1″ edge bore) for compatibility checks
- Fill mismatched screw holes with color-matched wood putty if switching lock types
- Test-fit new lock templates before drilling—most errors come from unverified measurements
Maintenance pro tip: Photograph screw hole patterns and bore dimensions. This saves 20+ minutes when installing replacements and prevents “why won’t it fit?” frustration.
Troubleshoot Stuck Components Before Damage Occurs
When parts resist removal, these manufacturer-approved fixes prevent costly mistakes.
| Problem | Immediate Fix |
|---|---|
| Spinning interior housing | Remove set screw completely, then separate halves by hand |
| Sheared screw head | Drill out shank carefully; repair hole with dowel + wood glue |
| Keypad won’t release | Confirm both through-screws removed; use plastic tool on gasket |
| Torn ribbon cable | Contact manufacturer with model/serial—no DIY repair possible |
Consequence alert: Forcing stuck components cracks door edges 3x faster than proper techniques. If resistance exceeds hand strength, stop and apply penetrating oil.
Handle Non-Deadbolt Smart Lock Variations
Not all smart locks follow the standard pattern—here’s how to adapt.
Mortise Lock Removal (August Wi-Fi Models)
- Expect 5+ lbs of weight—support the unit with both hands when loosening edge screws
- Withdraw sideways using flat-head screwdriver against strike plate if binding
- Skip deadbolt extraction—the entire mechanism slides out as one unit
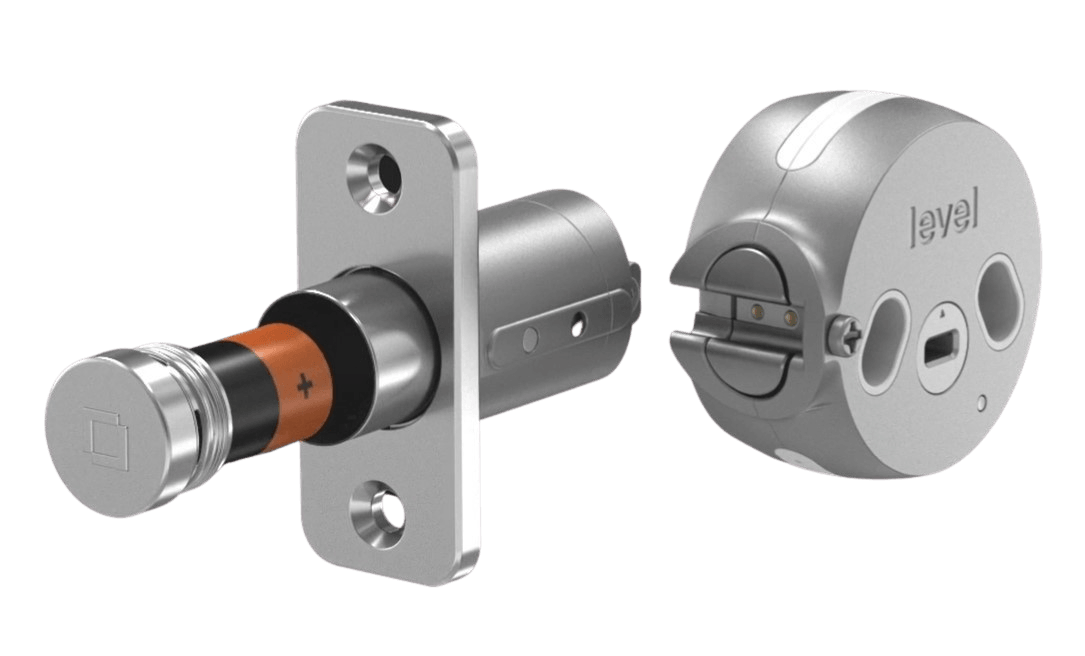
Cylinder Conversion Kits (Level Bolt)
- Remove interior thumb-turn first
- Unscrew set-screw and depress retainer tab near cylinder base
- Slide cylinder straight out in one smooth motion—no jiggling
Key difference: Knob/lever smart locks (Yale Assure) skip deadbolt steps entirely. Focus on latch assembly removal via two faceplate screws.
Store Components for Resale or Reinstallation
Improper storage ruins resale value and complicates future installations.
Post-Removal Checklist
- Bag all screws separately labeled “interior,” “exterior,” and “deadbolt”
- Factory-reset the lock via manufacturer’s app before selling (erases access codes)
- Keep original packaging—resale value drops 40% without it
- Photograph wiring connections for faster reinstallation
Critical step: Never skip the factory reset. Previous access codes could compromise new owner’s security.
Time and Cost Reality Check
You’re probably wondering: “Should I DIY or call a pro?” Here’s the breakdown:
| Task | DIY Time | Locksmith Cost |
|---|---|---|
| Standard deadbolt removal | 10-15 min | $50-$160 |
| Mortise lock removal | 20-30 min | $75-$200 |
| Damage repair | +30 min | $100-$400 |
The verdict: If you own a Phillips screwdriver and have 15 minutes, removing your smart lock yourself is 100% worth it. The only valid reason to call a locksmith is if you’ve already caused damage—like a stripped spindle or torn cable. For clean removals, professionals simply follow these same steps (just faster).
Your door now stands bare and ready—whether for a new smart lock installation or traditional hardware. By following this precise sequence, you’ve avoided the top 3 removal disasters: sheared screws, destroyed wiring, and door damage. Remember to vacuum bore holes before installing replacements, and always factory-reset old units. If you hit unexpected resistance, revisit the troubleshooting table before forcing components. In under 20 minutes, you’ve saved significant cash while gaining confidence for future DIY security projects. Ready for what’s next? Measure those bore holes and compare them to your new lock’s template—your flawless installation starts right now.