Your Yale smart lock suddenly stopped responding to voice commands, or maybe you’re upgrading to a newer model. Whatever the reason, knowing how to take off Yale smart lock hardware properly prevents costly door damage and preserves your security system’s integrity. Many homeowners crack their door finishes or strip screws by forcing components during removal—a problem entirely avoidable with the right approach. This guide cuts through the confusion with model-specific instructions for both smart locks (like the YRD256) and traditional Yale locksets, plus critical steps to disconnect from Alarm.com before physical removal. You’ll learn exactly which screws to target, how to handle delicate wiring, and avoid the #1 mistake that turns a 10-minute job into an emergency door repair.
Essential Tools for Yale Smart Lock Removal Without Damage
Gather these specific items before touching a single screw: a magnetic-tip Phillips screwdriver (prevents dropped screws in tight spaces), small container for organizing hardware, and soft towel to protect your door’s finish. Skip the needle-nose pliers unless you’re disconnecting the wire harness—yanking wires instead of the connector housing causes 70% of electrical failures during removal. For traditional Yale locksets, keep a straightened paperclip or 1-inch nail handy to access hidden release pins. Pro tip: Place a labeled egg carton on your towel—each compartment holds components in removal sequence, making reassembly foolproof. Never start without verifying your door is closed and locked; an open door shifts alignment and strains spindle mechanisms during disassembly.
Why Magnetic Tips Prevent Costly Mistakes
Standard screwdrivers often drop screws into the door cavity when removing escutcheon plates—a nightmare requiring door disassembly to retrieve. Magnetic tips keep screws secured during removal, especially critical for the three tiny screws on YRD256 interior plates that easily vanish into wood grain. If you don’t own magnetic tools, wrap tape around the screwdriver tip to create instant magnetic properties. Always test screw retention on a spare screw before starting; forcing stripped screws wastes 20+ minutes and risks splintering your door.
Step-by-Step: Removing Your Yale YRD256 Smart Lock
Remove Interior Battery Cover Without Breaking Plastic
Start at the interior side where the black battery cover opposes the exterior keypad. Locate the single Phillips screw at the cover’s base—never pry upward as this cracks the plastic housing. Remove the screw completely, then lift the cover straight off toward you. If resistance occurs, check for paint sealing the edges; score the perimeter with a utility knife before retrying. Forcing it here damages the latch sensor housing underneath, triggering false “door ajar” alerts even after reinstallation.
Disconnect Power and Z-Wave Chip Safely
With the cover off, remove all four AA batteries—this cuts primary power but doesn’t disable Z-Wave. Locate the green rectangular Z-Wave chip at the assembly’s top (marked with Z-Wave logo) and pull straight out; it has no clips. Skipping this step risks electrical shorts when disconnecting the wire harness. Hold the chip by its edges only—oils from your skin degrade circuitry over time. Store it in an anti-static bag if reusing later.
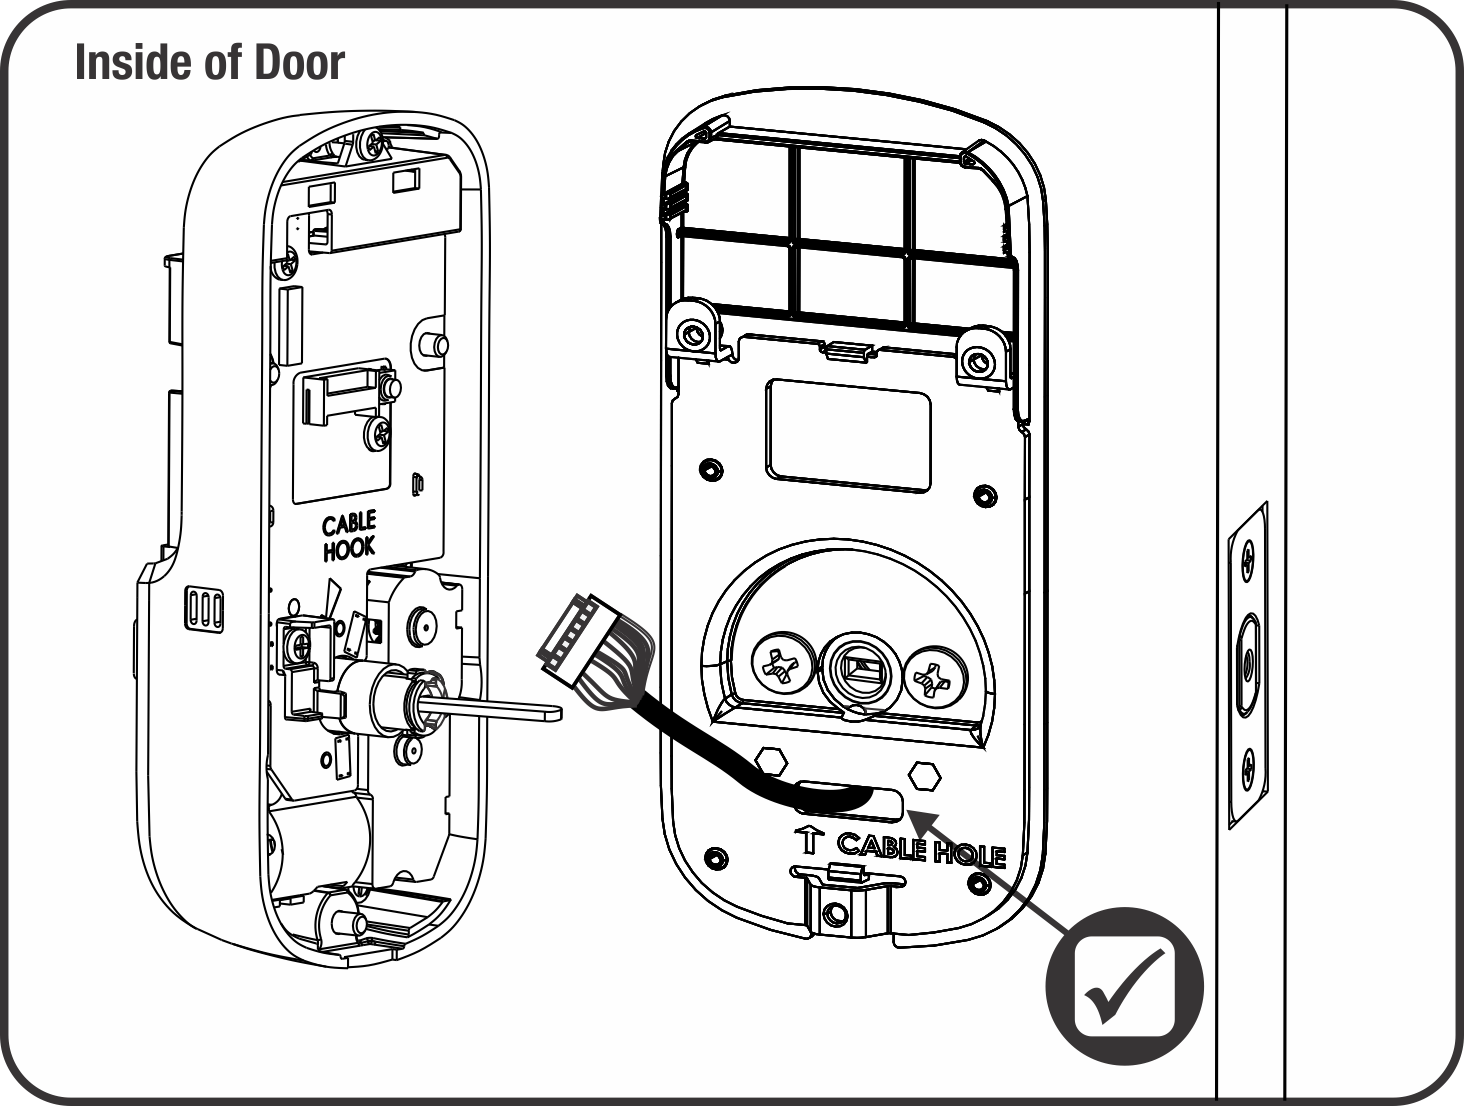
Unplug the Wire Harness Without Damaging Wires
The white multi-pin connector between interior and exterior units requires careful handling. Grip the plastic housing only—never the wires—and pull straight apart. If stuck, insert needle-nose pliers into the connector’s side grooves and squeeze gently while pulling. Yanking wires here severs internal conductors, requiring full lock replacement. You’ll hear a soft click when properly disconnected; if not, realign and retry—forcing it cracks the housing.
Remove Mounting Plate While Supporting Exterior Keypad
Two screws secure the interior mounting plate. Critical: Place your non-dominant hand firmly against the exterior keypad before removing either screw. Failure here causes $200+ damage when the keypad drops onto tile or concrete. Remove screws fully, then slide the mounting plate straight off the spindle. If the plate resists, check for paint bridging the gap between plate and door—score edges with a knife before proceeding.
How to Disconnect Yale Lock From Alarm.com Before Physical Removal
Initiate Exclusion Mode on Your Control Panel
Before touching hardware, disconnect from your smart system to prevent “ghost device” errors. On your 2GIG panel, navigate to Security > More > Tools > Program > Z-Wave Options > Remove Device. Select your Yale lock from the device list—confirm it’s the correct lock by checking its room assignment. Initiate exclusion mode; the panel will beep and display “Remove Device Mode Active” for 30 seconds. This step is non-negotiable: removing hardware first traps the lock in your network, blocking new device additions.
Execute Lock-Side Exclusion With Correct Keypad Sequence
Stand at the Yale lock and enter your master programming code (default is 1234 unless changed). Immediately press 7, then 3. The lock responds with a single beep and green LED flash—no beep means failure. Common errors include using user codes instead of programming codes or pressing digits too slowly. Retry within 30 seconds if no confirmation; exceeding this window requires restarting the panel exclusion process.
Verify Complete Disconnection on Alarm.com
Within 2 minutes, log into Alarm.com on your computer. Navigate to Devices > Locks—your Yale unit should disappear from the list. If visible, repeat exclusion steps; residual connections cause failed installations of new locks. Never skip verification—a half-disconnected lock drains batteries rapidly and triggers false alarms when reinstalled.
Removing Traditional Yale Locksets: Hidden Screw Method

Locate the Release Pin Without Damaging Finish
Traditional Yale locksets hide release mechanisms behind decorative collars. Never pry off the finish ring first—this exposes the release pin slot at 3 or 9 o’clock but often cracks the ring. Instead, inspect the collar edge for a tiny pinhole (1/16″ diameter). For painted-over installations, use a flashlight at a 45-degree angle to spot the dimple. If completely sealed, drill a 5/32″ hole 1/8″ from the collar edge—stop drilling immediately when you feel resistance drop, indicating you’ve pierced the retainer.
Depress Retainer Pin and Remove Handle Safely
Insert a straightened paperclip into the hole and press inward firmly. While maintaining pressure, pull the interior lever straight off the spindle—never twist or wiggle. If stuck, tap the lever base with a rubber mallet while depressing the pin. Forcing it shears internal spindles, requiring full lock replacement. Once removed, the inner rose plate slides off to reveal two mounting screws securing the entire mechanism.
Fixing Stuck Yale Lock Components: Paint, Rust, and Tight Spindles
Break Paint Seals Without Scratching Wood
Paint bridging between components causes 60% of “stuck lock” issues. Score the seam with a utility knife held at 30 degrees—never use screwdrivers as wedges. Apply penetrating oil along the seam and wait 15 minutes. For stubborn cases, wrap a rubber band around the component and pull with steady pressure while rotating slightly. If paint remains bonded, use a heat gun on low setting for 10-second intervals to soften the bond.
Free Corroded Screws Without Stripping Heads
Rust-frozen screws require strategic treatment. Apply PB Blaster directly to the screw head and let soak 30 minutes. Place a rubber band over the screw head, then insert your screwdriver—the rubber fills stripped grooves for better grip. Turn counterclockwise with firm, short pulses. If still stuck, tap the screwdriver handle gently with a hammer to shock the corrosion loose. As a last resort, use a screw extractor kit—drilling into the screw head risks damaging internal lock mechanisms.
Avoid These 3 Costly Yale Lock Removal Mistakes
Forcing Components Past Resistance
When a plate won’t budge, stop immediately—95% of door damage comes from ignoring resistance. Recheck for hidden screws (common behind battery covers) or paint seals. Forcing components cracks plastic housings and splinters door edges, requiring $150+ repairs. Always verify all fasteners are removed before applying pressure.
Dropping the Exterior Keypad Assembly
This mistake costs homeowners $200+ in replacement fees annually. Always support the exterior unit with your palm when removing interior mounting screws. If working alone, wedge a folded towel between the keypad and door frame. A dropped keypad often cracks its circuit board or shatters its faceplate.
Pulling Wires Instead of Connectors
Yale’s wire harness uses delicate ribbon cables. Gripping wires during disconnection severs internal conductors—always grasp the plastic housing. If you see frayed wires, stop immediately; this requires professional repair. Damaged wiring voids warranties and creates electrical fire risks.
Preparing Your Door After Yale Smart Lock Removal
Clean the mounting surface with isopropyl alcohol to remove adhesive residue—never use acetone as it degrades wood finishes. Check door thickness with a caliper; standard exterior doors measure 1-3/4″, but older homes vary. If installing a new smart lock, verify compatibility—Yale’s newer models require 2-1/8″ bore holes. Finally, remove strike plate screws if replacing the entire system; leftover screws interfere with new deadbolt alignment and cause jamming.
Final Note: Your Yale smart lock removal is complete when all components are free, the door surface is prepped, and the lock is fully disconnected from smart systems. Store screws in labeled compartments by removal location—this saves 15+ minutes during reinstallation. For future upgrades, perform a factory reset before disposal to erase security codes. Now that your door is ready, explore our guide on choosing the right Yale replacement model for thick doors to avoid common fitment issues.