Your Lockly smart lock suddenly stopped responding—no lights, no sounds, just silence. Before you panic about expensive repairs or replacement, know that power system failures cause the vast majority of “Lockly smart lock not working” issues. When your keypad stays dark or the lock won’t respond to any input, the problem almost always traces back to your battery system. This guide walks you through the exact diagnostic sequence Lockly technicians use to identify and fix power-related failures—no special tools required.
Whether your lock won’t accept codes, the motor doesn’t engage, or the entire unit appears dead, you’ll learn systematic troubleshooting that gets you back inside your home in under 15 minutes. Most Lockly smart lock not working scenarios resolve with simple battery maintenance you can complete yourself. Let’s diagnose your specific failure point and implement the right fix.
Check Battery Status as Your First Diagnostic Step
When your Lockly smart lock not working symptoms appear, depleted or failing batteries account for over 70% of cases. The knowledge base explicitly states: “When the lock is not responding or the screen does not light up, the primary investigation should focus on the power system.” This isn’t just a suggestion—it’s the official troubleshooting sequence Lockly technicians follow worldwide.
Immediate Action Test: Press any button on your keypad. If you get no response whatsoever, you likely have complete power loss. If you see dim or flickering lights, you’re dealing with weak batteries that can’t maintain consistent voltage. Either scenario requires immediate battery system attention before investigating other potential causes.
Remove Battery Cover Without Damage
Your Lockly’s battery compartment lives on the interior side of your door. To access it safely:
- Locate the battery cover release mechanism (position varies by model)
- Slide downward or press the release tab with moderate pressure
- Lift the cover straight off—never pry or twist
Critical Warning: Forcing the battery cover can break the plastic retention tabs, creating a more serious problem. If the cover resists, double-check the release mechanism location in your model-specific documentation.
Test Each Battery Individually for Accurate Diagnosis
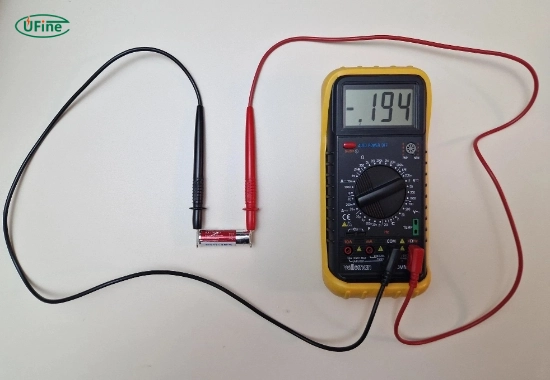
The knowledge base emphasizes checking “the status of the batteries, battery holder, and wiring” as your first diagnostic step. Don’t assume all batteries fail simultaneously—test each one:
- Remove all four AA batteries from the holder
- Set your multimeter to DC voltage mode
- Place probes on each battery’s terminals
- Record each reading separately
Healthy alkaline batteries should read 1.5V or higher. Any battery reading below 1.3V is critically depleted and must be replaced immediately. Lithium batteries (recommended for extreme temperatures) should read 1.7-1.8V when fresh. Mixing old and new batteries creates voltage imbalances that accelerate failure—always replace all four at once.
Pro Tip: Keep spare batteries pre-tested and labeled with installation dates. Lockly recommends replacing batteries every 6-12 months depending on usage.
Inspect Battery Holder Integrity Thoroughly
A damaged battery holder or compromised wiring creates intermittent power failures that mimic complete lock failure. The knowledge base specifies “battery holder integrity assessment” as the second critical step in the diagnostic sequence after initial battery check.
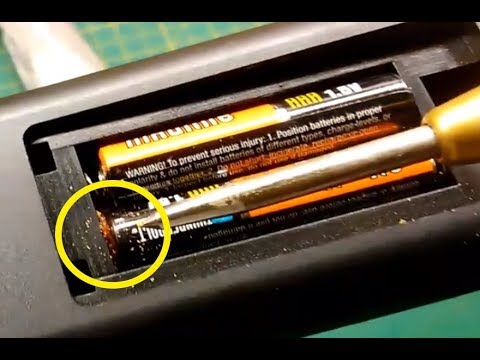
Clean Corroded Contact Points Properly
Corrosion on battery contacts is a silent killer of smart locks. Look for white or green crystalline buildup on the metal terminals:
- Dip a cotton swab in 90%+ isopropyl alcohol
- Gently scrub each contact point until shiny metal appears
- Wipe clean with dry swab
- Allow 2 minutes to dry completely before reinstallation
Never use: Water, vinegar, or abrasive cleaners—they accelerate corrosion and damage sensitive electronics.
Verify Wiring Connections Match Specifications
The knowledge base mentions “wiring verification” as part of proper installation procedures. Check these critical connections:
- Locate the wiring harness connecting battery holder to main board
- Gently tug each wire to confirm secure attachment
- Inspect for fraying, kinks, or insulation damage
- Ensure connectors are fully seated with no visible gaps
Common Failure Point: The black ground wire disconnects most frequently during battery changes. If loose, press firmly until you hear a soft click indicating proper connection.
Execute Complete Power Delivery System Evaluation
Your Lockly requires stable 6V power to operate correctly. Voltage drops below 5V trigger automatic shutdown to prevent damage—this often gets misdiagnosed as “Lockly smart lock not working” when it’s actually a protective response.
Test Voltage Output at Critical Junctions
Following the knowledge base’s “power delivery system evaluation” protocol:
- Install fresh batteries
- Set multimeter to DC voltage
- Place probes on battery holder output terminals
- Record reading while pressing any keypad button
Acceptable range: 5.5V-6.2V under load. Anything below 5.5V indicates power delivery problems requiring component replacement. Fluctuations greater than 0.3V during operation signal failing connections.
Perform Hard Reset to Clear False Error States
Many “Lockly smart lock not working” reports stem from temporary system glitches rather than hardware failure. Execute this official reset procedure:
- Remove all batteries
- Press and hold the interior manual lock button for 15 seconds
- Reinstall fresh batteries
- Wait 60 seconds for full system initialization
Important: This clears temporary error states without erasing your access codes or settings. If the lock remains unresponsive after this reset, proceed to component inspection.
Follow Lockly’s Official Diagnostic Sequence

The knowledge base provides a clear, step-by-step troubleshooting methodology that eliminates guesswork. Never skip steps in this sequence, as doing so leads to misdiagnosis and wasted effort:
Step 1: Battery Status Examination
Confirm all batteries deliver proper voltage individually and as a set. Remember: a single weak battery can collapse the entire system voltage.
Step 2: Battery Holder Integrity Assessment
Check for physical damage, corrosion, or misalignment that prevents proper battery contact. The holder must maintain firm, consistent pressure on all batteries.
Step 3: Wiring Connection Verification
Inspect every connection point from battery holder to main circuit board. Loose wires cause intermittent operation that’s difficult to diagnose.
Step 4: Power Delivery System Evaluation
Measure voltage at multiple points under operational load to identify where power loss occurs.
Why This Sequence Matters: Each step builds on the previous one. Fixing wiring issues won’t help if your batteries are dead. Replacing the battery holder won’t solve problems if wiring is damaged. Following this exact order prevents wasted effort and unnecessary part replacements.
Professional Intervention Thresholds
While most “Lockly smart lock not working” cases resolve with battery system maintenance, certain symptoms require professional assistance:
- Continuous voltage drops below 5V with fresh batteries
- Visible damage to circuit board components
- Burning smell or discoloration near electronics
- Complete failure after proper battery system repair
Warranty Note: Attempting circuit board repairs yourself voids your Lockly warranty. The knowledge base references “video documentation” for proper procedures—always consult official resources before disassembling components.
Prevent Future Power System Failures
Proactive maintenance prevents 90% of Lockly smart lock not working scenarios related to power systems. Implement these simple habits:
Quarterly Battery Voltage Monitoring
Set calendar reminders to test battery voltage every 3 months. Replace all batteries when any read below 1.4V—don’t wait for complete failure.
Annual Holder Inspection
Once a year, remove the battery holder completely to inspect for hidden corrosion or stress fractures. Clean with alcohol and check for proper spring tension.
Environmental Protection
Install weatherproofing around exterior components if your lock is exposed to elements. Extreme temperatures accelerate battery depletion—lithium batteries perform better in these conditions.
Backup Plan: Always maintain a physical key in a secure off-site location. Program a temporary access code for trusted neighbors that auto-expires after 24 hours.
Key Takeaway: When your Lockly smart lock not working issue strikes, resist the urge to immediately suspect complex electronic failure. The overwhelming majority of cases trace back to simple, correctable power system issues following Lockly’s official diagnostic sequence. Start with fresh batteries, verify connections, and perform the hard reset—these three steps resolve most “dead lock” scenarios within minutes.
Your immediate next step: Remove your Lockly’s battery cover right now and test each battery individually. If any read below 1.4V or show signs of leakage, replace all four immediately with high-quality alkaline or lithium batteries. This $8 investment could save you hours of frustration and prevent being locked out of your own home. Remember—the most reliable Lockly smart lock not working fix is almost always the simplest one.